


Thread damage is a common occurrence in industrial piping, hydraulic systems, and mechanical equipment. Thread damage does not equal a scrapped part. With the right repair method, full functionality can be restored at a fraction of the replacement cost. This guide covers how to repair damaged NPT (tapered) and BSPP (parallel) pipe threads.
Quick Identification
Before starting, identify the damage type and thread standard.
| Damage Type | Repair Method |
| External thread (male) damage | Thread file or round die |
| Internal thread (female) damage | Thread insert kit |
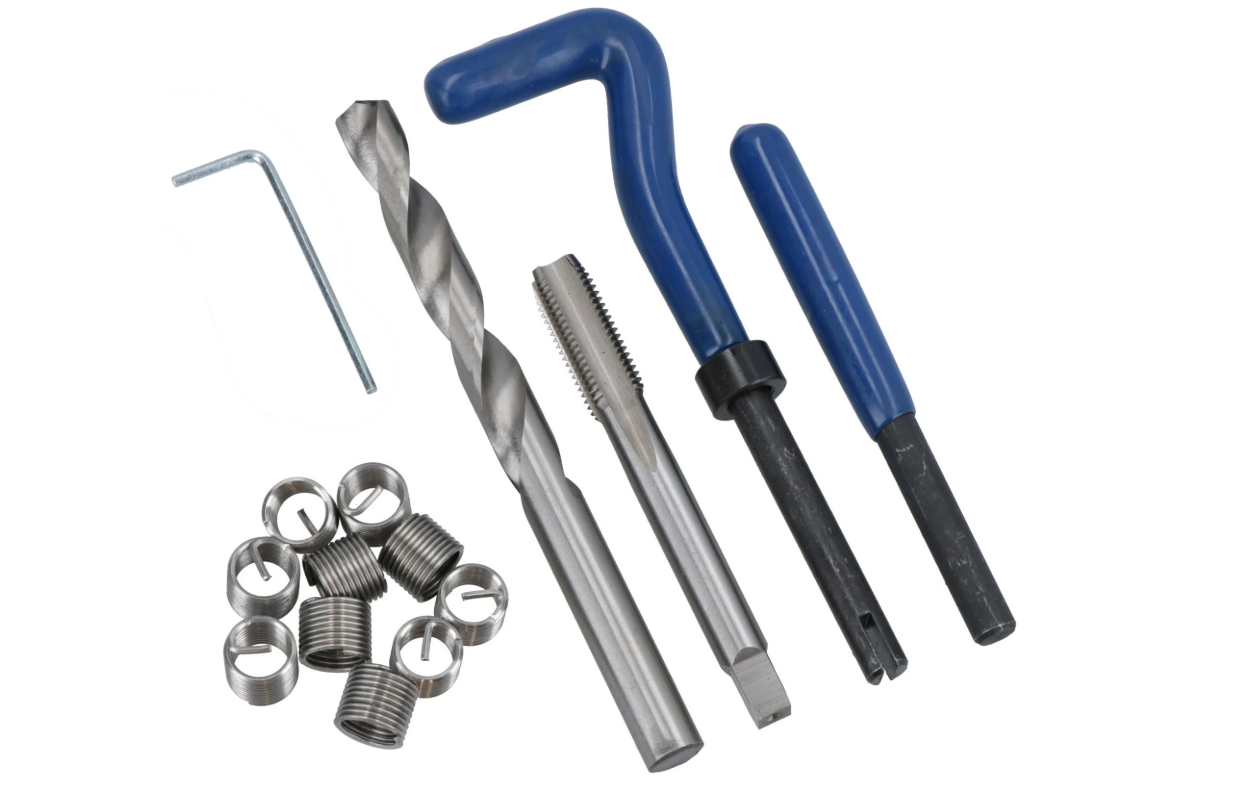 For external thread damage, such as burrs, slight deformation, or corrosion debris on male threads, you will typically use a thread file or a round die. For internal thread damage inside a threaded hole or port, you will need a thread insert kit. As for the thread standard, NPT and BSPP are the two most common pipe thread types in industrial applications. In short, NPT is a tapered thread that seals through thread interference and requires a dedicated NPT insert kit. BSPP is a parallel thread that seals via an O-ring or gasket and uses standard G-thread wire inserts. It is critical to understand that these two standards are not interchangeable.
For a more detailed comparison, please refer to our dedicated article on NPT vs. BSPP or Male vs. Female Thread.
Repair Methods

External Thread Repair
For minor damage on external threads, a thread file is usually sufficient. You should select a file that matches the thread TPI. For example, use an 11.5 TPI file for 2″ NPT and an 11 TPI file for 2″ BSPP. Never substitute one for the other, as the pitch difference will compromise the seal. When using the file, always work along the existing thread direction, following the spiral of the thread rather than filing straight across.
For more severe external thread damage, a round die is required. For 2″ NPT, you need a die with 11.5 TPI, and for 2″ BSPP, you need a die with 11 TPI. Before using a die, make sure the threads are thoroughly cleaned to remove any debris or corrosion. Carefully align the starting thread to avoid cross-threading. Always use cutting fluid during the process to extend tool life and produce a clean, smooth thread.
Internal Thread Repair
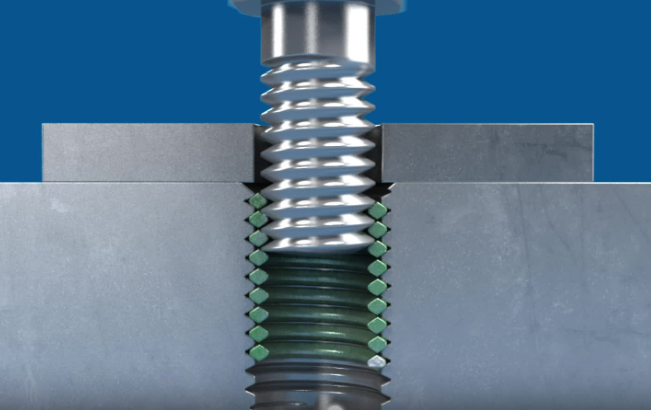
For internal thread damage, thread inserts are the most common and reliable solution. The insert kit you choose must match your thread standard.
For NPT threads, you must use a dedicated NPT tapered insert kit. Standard wire inserts are not suitable because they are designed for straight, parallel threads and will not maintain the tapered seal that NPT requires. For BSPP threads, which are parallel, you can use standard G-thread wire inserts.
The two most common types of inserts are Helicoil-type wire inserts, which are coiled from stainless steel wire and suitable for most general-purpose repairs, and Time-Sert-type solid inserts, which are solid metal sleeves requiring a counterboring step and are better suited for high-stress, permanent repairs.
Step-by-Step Installation
The following step-by-step procedure applies specifically to internal thread repair using thread inserts. External thread repair using a thread file or die does not follow this process — refer to the external thread repair section above for those methods.
Step 1: Drill
Use the oversize drill bit provided in your kit to drill out the damaged thread. Keep the drill perpendicular to the surface and use steady pressure, clearing swarf regularly to prevent binding.
Step 2: Tap
Use the Screw Thread Insert tap that came with the kit. This tap cuts the special oversize thread that the insert will lock into. Keep the tap aligned with the hole axis, use cutting fluid, and advance in short turns while backing off frequently to break chips. Tapping depth must be precisely controlled. Do not tap deeper than required. Using an NPT thread gauge (L1 plug) to check depth. Stop tapping when the small end of the plug is flush with the workpiece surface.
Step 3: Install the insert
Mount the insert onto the installation tool with the tang engaged in the slot, then wind it into the tapped hole with light, controlled pressure. Install until the top coil sits ¼ to ½ turn below the surface. Do not force it. If the insert binds, stop and check that the tapped hole is clean and free of debris.
Step 4: Break the tang
Place the tang break tool or a punch over the tang and tap down sharply with a hammer. Do not try to twist the tang off, it must be broken with a sharp blow. Remove the tang and all swarf from the hole.
Before breaking the tang, ensure the hole is deep enough to accommodate the fallen tang, or use a magnetized punch to catch the tang immediately after it breaks to prevent it from lodging at the bottom.
Step 5: Verify
Thread in a bolt or fitting by hand to confirm smooth engagement. For NPT threads, use an NPT thread gauge to ensure the taper sealing capability has been restored.
Troubleshooting
Even with careful work, problems can sometimes occur.
Troubleshooting
Even with careful work, problems can sometimes occur. There are common issues encountered during thread repair and how to do it.
Thread still loose after repair
Possible cause is Wrong drill size or wrong insert, re-do with correct drill bit and insert. For instance, for a 10-32 Helicoil repair, the kit specifies a 13/64″ (5.16 mm) bit. If you use a 3/16″ (4.76 mm) bit, the hole is undersized, and the insert cannot seat correctly. Also verify the insert package — a 10-32 insert will not fit an M5 hole. To fix, drill out the insert, re-drill with the correct bit, re-tap, and install a fresh insert.
Insert won’t go in smoothly
First, flush the hole with solvent and blow it out with compressed air. If the insert still binds, inspect the tap. Look for chipped or rounded cutting teeth, visible wear flats, or metal smeared on the flutes. If the tap is damaged, replace it and re-tap the hole. If cross-threading occurred, back the insert out, realign the installation tool perpendicular to the hole, and start again with light pressure.
Leakage
For NPT leakage, control the tapping depth – do not tap too deep. Check with an NPT L1 thread plug gauge. If the gauge sinks below flush by more than 1/2 turn, the hole is overtapped. For a workaround, apply a high-quality PTFE sealant rated for your pressure and temperature, but for critical applications the part must be replaced or re-machined.
BSPP leakage is most likely caused by a damaged sealing surface; inspect and repair the O‑ring/gasket sealing face. For deeper damage, the face needs counterboring and re-facing on a lathe or mill — a machine shop task. Always install a new O-ring or gasket during reassembly.
Tang won’t break off
Your insert is not fully seated. Make sure the insert has been completely screwed in. If not, the insert needs to go deeper. Re-engage the installation tool and turn the insert another 1/4 to 1/2 turn until the top coil is 1/4 to 1/2 turn below the surface. Then place the tang break tool or a flat punch directly over the tang and strike sharply with a hammer. Do not twist — it must be broken with a sharp blow. If it still won’t break, check that you are using the correct size punch.
Tap breaks during threading
This indicates insufficient cutting fluid or misalignment during the operation.
Fluid: Apply cutting fluid every 1/2 turn. Dry tapping generates heat and causes galling, which can snap the tap.
Alignment: Before starting, check the tap from two angles 90° apart — it must be perfectly perpendicular. Use a tap guide or a drill press with the chuck loosened (allowing the tap to self-center) to reduce misalignment risk.
Technique: Follow the “1/4 turn forward, 1/8 turn back” cycle to break chips and clear flutes.
If a tap breaks anyway, use a tap extractor with prongs that fit into the flutes to back it out. For severe cases, EDM (electrical discharge machining) is required — a specialized process best left to a machine shop. Prevention is far easier than extraction.
FAQ
Q1. Can I repair NPT threads with a standard Helicoil kit?
No. NPT threads are tapered and require a dedicated NPT insert kit. Standard wire inserts are designed for straight, parallel threads only and will not provide a proper seal for NPT.
Q2. How deep should I install the thread insert?
The top coil should sit ¼ to ½ turn below the surface. This ensures the insert is properly seated without interfering with the mating part.
Q3. What are the TPI for 2″ NPT and 2″ BSPP?
2″ NPT has 11.5 TPI, and 2″ BSPP has 11 TPI. Always confirm the TPI before selecting a thread file, die, or insert kit.
Q4. Can I use NPT and BSPP fittings together?
No. They have different thread angles and different geometry, tapered versus parallel. They will not seal properly and may damage both threads. Never mix them.
Contact Us
Repairing the thread is only the first step, preventing future damage is just as important. We offer high-quality NPT and BSPP thread fittings to help you build more reliable, longer-lasting connections. NPTLOK manufactures instrumentation tube fittings and valves for more than 20 years with an ISO certificate.
We offer a full range of NPT and BSPP thread fittings up to 2″. For any inquiries or to download our product catalog, please feel free to contact us.


