


To install a ferrule fitting, prepare the tube end, fully insert the tube, and tighten the nut according to the instructions for the fitting series and size. Single- and double-ferrule designs may require different assembly procedures. This guide gives you the differences and gives initial tightening instructions for double ferrule fittings.
Understand the Parts of a Ferrule Fitting
A ferrule fitting consists of a body, a nut, and one or more ferrules. As the nut is tightened, the ferrules work against the tube and fitting body to create a seal and grip the tube. There are two main configurations:

Single ferrule fittings: Use one ferrule to provide both sealing and tube grip. Some designs allow direct assembly, while certain cutting-ring designs require preswaging and inspection before final installation.
Double ferrule fittings: Use a front ferrule and a back ferrule. The front ferrule primarily provides sealing, while the back ferrule primarily grips the tube.
Installation requirements vary by design. Always follow the instructions for the specific fitting series. 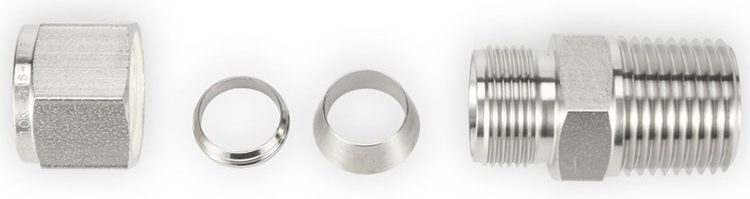
Check the Tubing and Tools
Check the Tubing
Choose tubing that meets the requirements of the fitting series and the application. Confirm its outside diameter, wall thickness, material, and allowable working pressure.
Tube hardness must meet the requirements of the fitting series. In our experience, fully annealed metal tubing works best. It should be softer than the fitting material and suitable for bending and flaring.
Based on our experience, we recommend that you use fully annealed 304/304L or 316/316L tubing with a hardness of HRB 90 or less. If you select seamless stainless steel tubing using our working-pressure table, we recommend HRB 80 or less. Make sure your tubing also meets the other conditions listed in the table.

Before assembly, inspect the connection area. Look for scratches, dents, flat spots, contamination, and ovality. If the tubing is damaged or out of round, don’t force it into the fitting. And if you’re using welded tubing, confirm that the external weld bead meets your fitting manufacturer’s requirements.
Prepare the Tools
- A cutting tool suitable for the tubing material
- An internal and external deburring tool
- Two correctly sized wrenches
- A marker
- Clean, lint-free wipes
- Any inspection tool specifically approved for the fitting series

How to Install a Ferrule Fitting
Prepare the Tube
Cut the tube square to its axis with a suitable tool. Don’t flatten it, and don’t damage the area where the ferrule will seal and grip. Deburr the inside and outside edges, clean out chips and contamination. Use a method that fits the material and the cleanliness level your system requires. Inspect the prepared end before assembly.
If the tube is bent, leave enough straight length between the tube end and the bend for insertion and tooling. Follow the fitting manufacturer’s minimum straight-length requirement.
Install a Single Ferrule Fitting
First identify the exact fitting series and determine whether it requires direct assembly or separate preswaging.
For a direct-assembly design
- Position the nut and ferrule according to the product drawing.
- Insert the tube fully into the fitting body.
- Establish the starting position specified by the manufacturer.
- Hold the body steady and tighten the nut using the specified turns or torque.
- Complete the prescribed inspection.
Do not use a generic turn count for all single ferrule fittings. Even the reference point for tightening may differ between products.
For a design requiring preswaging
- Select the approved preswaging tool for the tube size and fitting series.
- Prepare and lubricate the specified surfaces only where required.
- Position the nut and ferrule correctly.
- Keep the tube fully seated in the tool during preswaging.
- Complete the prescribed preswaging operation.
- Inspect the ferrule engagement according to the product instructions.
- Complete final assembly using the separate installation requirements.
Some cutting-ring designs require inspection of a circumferential material ridge created by the cutting edge. This is a product-specific criterion and should not be treated as a universal inspection method.
Install a Double Ferrule Fitting
- Fully insert the tube
Insert the prepared tube through the nut and ferrules until it rests firmly against the internal shoulder of the fitting body. Keep it seated during assembly.
If the tube does not enter normally, remove it and check for burrs, incorrect dimensions, ovality, or misplaced components. Do not force it into position.
- Finger-tighten the nut
Rotate the nut finger-tight while maintaining full tube insertion. This establishes the reference point for the additional wrench turns.
- Mark the nut
Place a reference mark at the 6 o’clock position. Follow the clock diagram from a consistent viewing direction.
- Hold the body steady
Use one wrench to hold the fitting body and another to turn the nut. Avoid disturbing adjoining connections.
- Tighten by the specified turns
Initial Tightening Turns for NPT-LOK Double Ferrule Fittings
| Tube outside diameter | Additional tightening from finger-tight | Final mark position |
| 1/16, 1/8, and 3/16 in.; 2, 3, and 4 mm | ¾ turn | From 6 to 3 o’clock |
| 1/4 through 1 in.; 6 through 25 mm | 1¼ turns | From 6 to 9 o’clock |
| Over 1 in. / 25 mm | Separate preswaging and assembly procedure | See the large-size installation section |
For fittings over 1 inch / 25 mm, there is a separate procedure. Preswage the ferrules using the specified hydraulic equipment, lightly lubricate the designated surfaces, seat the preswaged assembly, and finger-tighten the nut. Then hold the body steady and tighten the nut one-half turn from 6 to 12 o’clock. Confirm the applicable tooling and operating instructions before beginning.
Inspection After Installation
Single Ferrule Fitting Inspection
For a preswaged cutting-ring design, the manufacturer may require disassembly after preswaging to inspect cutting-edge engagement and the material ridge around the tube. Other designs may use different inspection methods.
Do not assume that ferrule rotation, axial movement, or a visible ridge has the same meaning across all products. Apply the acceptance criteria for the exact fitting.
Double Ferrule Fitting Inspection
Check that the correct tubing was used and that the specified assembly procedure was followed. If an approved gap inspection gauge is available for the fitting series and size, use it according to its instructions.
A gap check does not confirm full tube insertion or prove that the system is leak-free. Complete the required system leak test before putting the connection into service.
Reassembly Procedure
Isolate and depressurize the system before disassembly. For single ferrule fittings, follow the instructions for the specific product series.
For our double ferrule fittings, mark the relative position of the nut and body before loosening the connection. Inspect the components, then reinsert the tube with its attached ferrules until the front ferrule seats against the body. Hold the body steady, return the nut to its original marked position, and tighten slightly.
Do not repeat the initial installation turns during reassembly.
Common Ferrule Fitting Installation Mistakes
Similar sizes get mixed up
A 1/4 in. tube and a 6 mm tube can look almost identical. They still take different fittings. Check the size marking before assembly, and don’t store inch and metric parts in the same bin.
Scratches or burrs get missed
Look at the area where the ferrules contact the tube. Burrs and chips have to come off. If the sealing area is scratched or damaged, replace the tube. Trying to run it usually just leads to a leak.
Tightening before the tube is fully seated
Push the tube against the internal shoulder and keep it there while you finger-tighten the nut. Never wrench-tighten a fitting with no tube in it.
Pulling misaligned tubing into place with the nut
Align the tube with the fitting before assembly. Adjust the tube routing rather than using the nut to force the connection together.
Assuming tighter means better
Extra tightening can deform the tube and ferrules. Mark the nut and follow the turns specified for the fitting series and size.
FAQ
Q1: Can I reuse ferrules on a different tube after disassembling a fitting?
No. The ferrules are permanently swaged onto the original tube end during initial installation. They should not be removed and reused on another tube. However, the existing tube with pre‑swaged ferrules can be reassembled into the same fitting body multiple times following the reassembly procedure above.
Q2: How many times can a double-ferrule tube fitting be reassembled?
There is no fixed number. Reassembly is acceptable as long as the ferrule cutting edge remains intact, the raised band is uniform and continuous, and the body cone seat shows no damage. Inspect before each reassembly — when in doubt, replace the fitting. Our fittings can withstand up to 12 repeated reassemblies while maintaining strong, gall-resistant thread structure and tight seal integrity.
Q3: Is thread sealant or PTFE tape required on tube fitting ends?
No. Tube fittings rely on the mechanical deformation of the ferrules against the tube wall and fitting cone for sealing, not on the threads. Thread sealants should only be used on pipe threads (e.g., NPT, BSPT adapters).
Contact Us
NPTLOK is a trusted manufacturer with over 20 years of experience in the field of high-performance tube fittings. We offer a wide variety of tube fittings capable of withstanding high-pressure and high-temperature environments.
NPTLOK tube fittings incorporate advanced anti-seizing technology and optimized thread geometry, making tightening easy and significantly reducing the required assembly torque. This effectively reduces operator fatigue and increases daily assembly speed—making them an ideal choice for high-density applications such as wellhead control.
Seeing is believing:https://youtube.com/shorts/ercRDE4NNp4?si=m1KuZzt1dzivFzfO


